
%20(1).png)
February 21, 2018
Continuous integration and delivery with Team Services and App Center
%20(1).png)
Recently we launched a new mobile app called Yuppl. It’s an app for 1:1 meetings that helps you have better work conversations. It provides structure to your 1:1s to keep you talking about the right things, and taking action when you said you would.
In building the app, we wanted to adopt good practices that would help us with getting updates to test and production in an efficient and reliable way. We used some of the latest Microsoft technologies to make this happen.
Continuous integration and delivery are development practices that reduce the cost, time, and risk of delivering changes by allowing for more frequent and incremental updates to applications in production.
This post gives a detailed walkthrough of how to set up these processes for Xamarin and Web API projects. Most of this is applicable to other types of projects too. We used a variety of tools to automate tedious build tasks like code signing, and show ways to manage development, testing, and production environments in a repeatable and more efficient manner.
Definitions
Here’s an introduction to the terminology and services we use in this post.
Continuous Integration (CI)
Continuous integration is the practice of merging a team’s development work frequently. Each commit is verified by an automated build and test to detect problems early.
This approach reduces integration issues and allows the team to develop cohesive software more rapidly.
Continuous Delivery (CD)
Continuous delivery is the practice of building software in a way that can be released to production at any time.
You achieve continuous delivery by continuously integrating the software done by the development team, building executables, and running automated tests on those executables into increasingly production-like environments to ensure the software will work in production.
DevOps
DevOps is a set of practices that automate the processes between development and operations teams, so that they can build, test and release software faster and more reliably.
Under the DevOps model, development and operations teams are no longer “siloed” and the focus is on building a culture of collaboration between the two teams. Benefits can include increased trust, faster software releases, and the ability to solve critical issues quickly and better manage unplanned work.
Continuous integration and continuous delivery are two key components of DevOps.
Visual Studio Team Services (VSTS)
VSTS is a collection of hosted DevOps services for developers.
Build and Release are two of the DevOps services in VSTS that help to manage the continuous integration and continuous delivery of your applications. In each service, you can specify the different tasks you want to run during the build or release process.
Visual Studio App Center (VSAC)
VSAC is a collection of services for automating and managing the lifecycle of your mobile apps. The services include build automation, beta app distribution, real device testing, crash reporting and more.
It’s the next generation of HockeyApp and Xamarin Test Cloud, and will be replacing these services entirely in the future.
Sample continuous integration and continuous delivery setup for Xamarin projects (iOS)
Build definition in VSTS
In this section I’ll go through the steps involved in setting up an automated build for a Xamarin.iOS project (numbered 1-10 below). The definition uses different types of tasks to manage code signing, update app configurations, build the solution, run tests, and produce the files needed to make a release.

1. macOS build agent
To build your code or deploy your software you need at least one agent. An agent is installable software that can run a build or deployment job at a time.
You can use VSTS’s hosted agents, which are maintained and upgraded by Microsoft, or use a private agent which gives you more control to install dependent software needed for your builds and deployments.
Setting up a private agent
It’s easy to set up a private agent. Simply download the agent files from VSTS, run the provided configuration script to link it up with your VSTS account, and start the run script.
See here for more information on setting up a macOS agent.
2. Connect to your repository
Your code can come from GitHub, Bitbucket, Subversion or even be hosted directly on VSTS.
To connect to a remote repository, create a service endpoint under Settings > Services.
Service endpoints are reusable connections to external and remote services that can be used in your build and release tasks.
Enable continuous integration
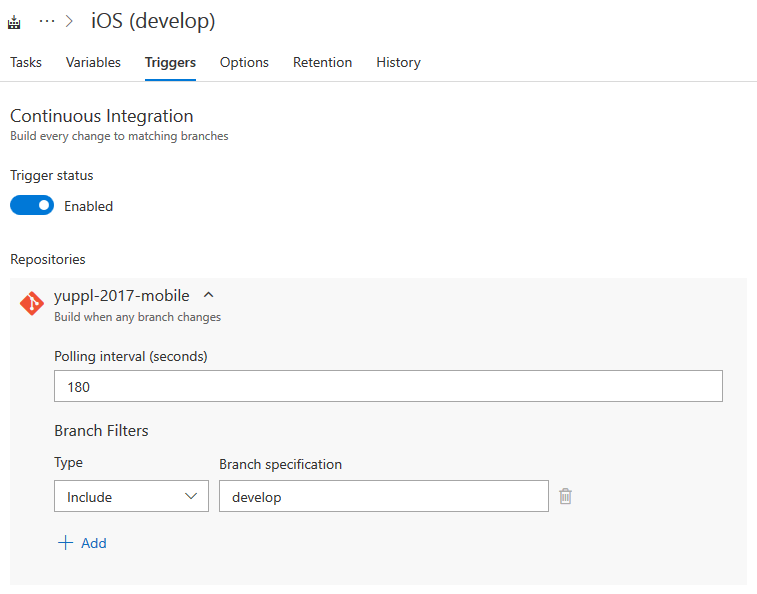
After connecting your repository, enable continuous integration under the Triggers tab of your build definition and specify the branch you want to build. VSTS will poll external repositories on a specified interval and any commits to this branch will trigger a build.
4. Restore NuGet packages and Xamarin Components
You can store values and encrypt sensitive account information in process variables for reuse within the definition. There are also variable groups which can be used to store values that you want to share across multiple build and release definitions.
You can access these variables in your tasks by using this syntax: $(VariableName)
5. Use fastlane’s match action to manage your iOS certificates and profiles
Managing multiple certificates and provisioning profiles for multiple projects can get complicated.
When manually creating certificates through Apple’s developer portal, you need to create a Certificate Signing Request (CSR) file on your macOS machine and upload it to the portal.
The CSR creates a key pair - the private key is stored on your machine and the public key is used to issue the certificate and is stored with the certificate on the portal.
In order to use the same certificate on a different machine, you need to export the installed certificate to a .p12 file which bundles the certificate with its public and private key as a signing identity.
If you lose access to the machine, or lose track of which machine created the certificate, you need to create a new certificate – you can’t use a certificate downloaded from the portal without its private key.
Introducing fastlane
Fastlane is a tool for automating beta deployments and releases for iOS and Android apps. Fastlane and its match action make code signing easy.
The match action lets you share one code signing identity across your development team to simplify you code signing setup and prevent code signing issues. It creates all required certificates and provisioning profiles and stores them in a private git repository. Each team member with access to the repository can use those credentials for code signing. It also automatically repairs broken and expired credentials.
Setting up a new machine for development is as simple as running a single command.
Installing fastlane
Make sure you have the latest version of Xcode command line tools installed by running this command in the terminal.
Appfile, Fastfile and lanes
Fastlane works by following instructions defined in a Fastfile. Inside the Fastfile, you can specify different lanes for different workflows of sequential tasks.
An Appfile can be used to store information used across the lanes like your Apple ID and bundle identifiers.

In this example, the certificates_and_profiles lane uses the match action to create development, ad hoc, and app store profiles (and the required certificates) for the specified bundle identifier.
By using the force_for_new_devices parameter, match will check if the device count has changed since the last time you ran match, and automatically re-generate the provisioning profile if necessary. This parameter is ignored and unnecessary for app store profiles because you don’t need to provision devices.
Setting VSTS environment variables from the Fastfile
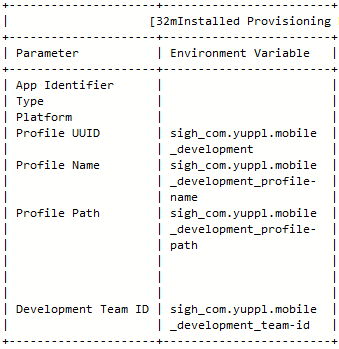
The match action creates and stores values like profile name and its file path in environment variables after profile generation/installation. You can transfer these to VSTS environment variables using the syntax in the previous screenshot for use in subsequent tasks.
More information on user-defined variables.
Calling fastlane from VSTS
You can execute a fastlane command via inline script or by running a script file with the Shell Script task. Inline scripts are quick and convenient, and script files can be useful for reusable logic like argument validation.
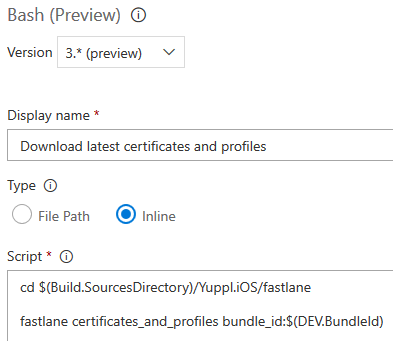
This example uses an inline script to call the certificates_and_profiles lane and pass a bundle identifier as an argument.
See here for more information on the match action.
5. Modifying Info.plist to update the app’s build number and app name
Fastlane has a bunch of handy actions and another one of them is the set_info_plist_value action. This action lets you easily modify property list files.
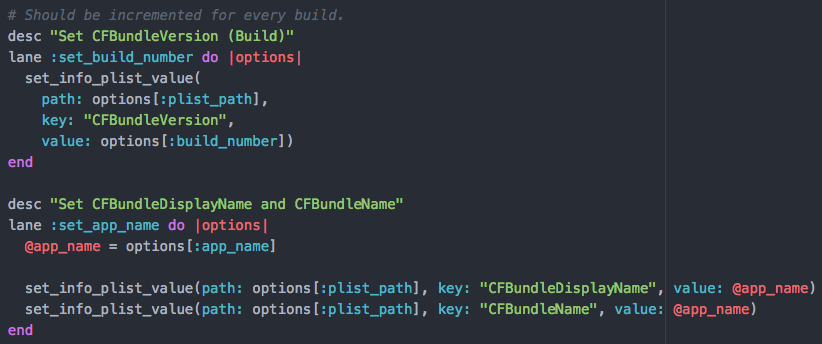
The action takes the file path, property key and value. Below is an example of calling fastlane through a script file with the Shell Script task.
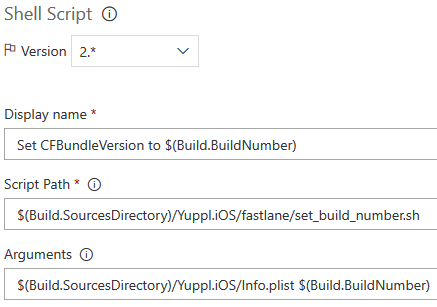
Predefined variables
VSTS has predefined build and release variables like source directory path and build number. These can be accessed in the same way as process variables.
See here for the full list of build variables.
6. Modifying JSON configuration files
For our app, we used a JSON file which we loaded into an object for app configurations. This makes it easy to modify values like API URL during the build process.
We used jq, a command-line JSON processor, to edit the configuration file through a shell script.

This script loads the configuration file into a JSON object with jq, sets the BaseAddress property and writes to a temporary file, and finally overwrites the original file and deletes the temporary file.
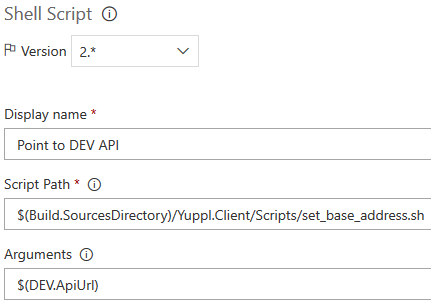
7. Build your solution
Create a build configuration that excludes unrelated projects (like Android) from the build so that the process is unaffected by irrelevant errors while also reducing build time. Configurations can be referenced by name in the build task.

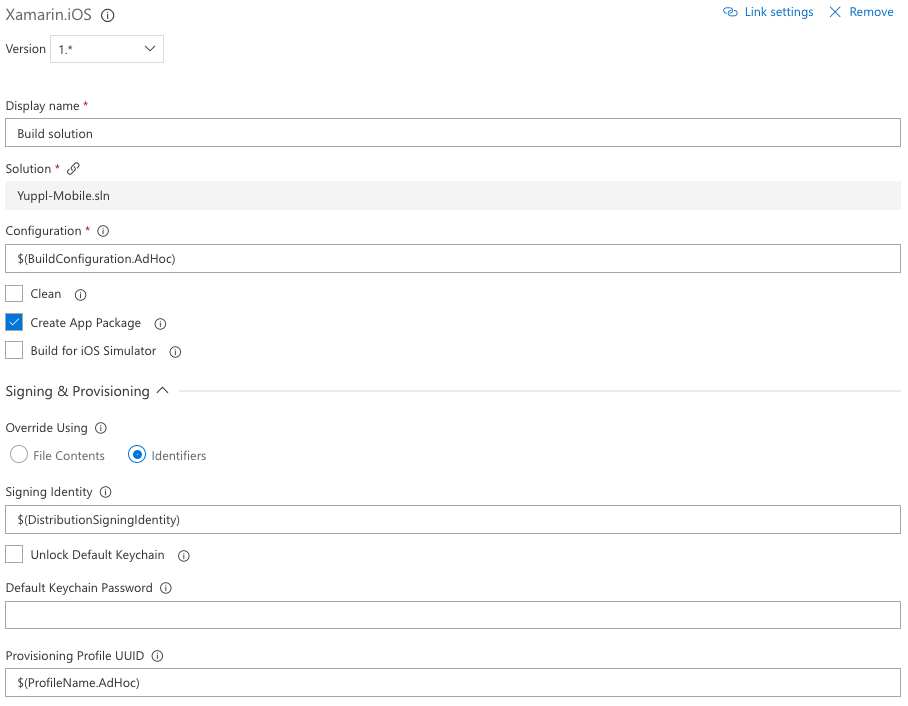
You can override the default code signing settings by providing a signing identity and provisioning profile by name. The environment variables set during the fastlane task can be accessed in the same way as process variables.

8. Run unit tests
9. Copy files to the artifact staging directory
Artifacts are the files that you want your build process to produce. They can be anything you need to test or deploy your app. In this case, we want to publish the .ipa app package produced by the solution build.
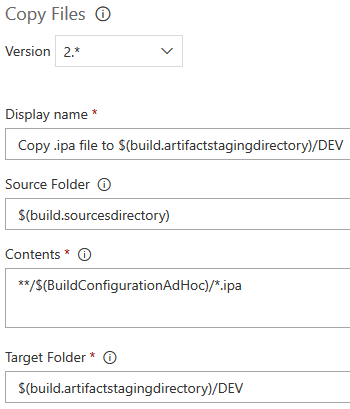
Copy artifacts to the artifact staging directory before publishing. This directory is cleared before each build, so you don’t have to clean it up yourself.
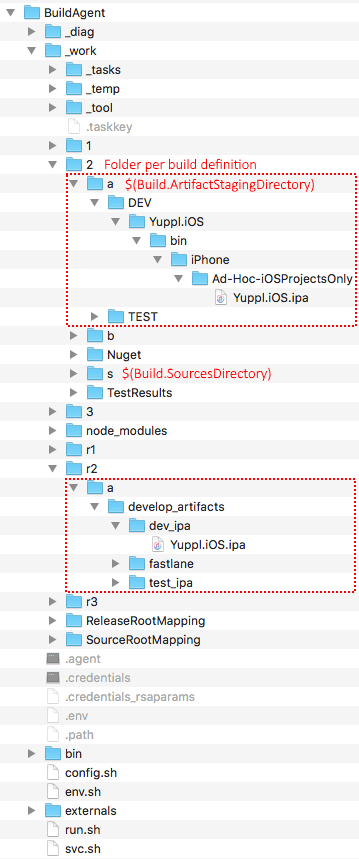
A numbered folder is created for each build definition inside the _work folder.
The “s” folder holds the source code and the “a” folder is the artifact staging directory.
Each release definition gets a numbered folder prefixed with an r. The “a” folder inside a release definition folder holds the downloaded artifacts.
10. Publish artifacts
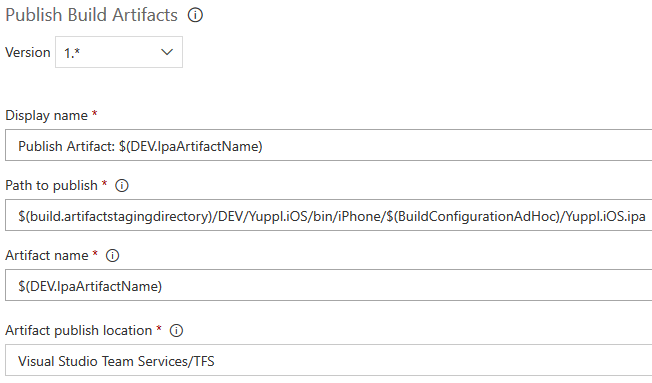
Specify artifact locations and publish to make it available for use in your release definitions.
We also publish the fastlane folder for additional tasks during the release.
Release definition in VSTS
A release definition defines the end-to-end release process for your app to be deployed across various environments. You define the release process using environments, and the automation in each environment using phases and tasks.
In this section I’ll show you how to use different tasks to update your app’s version number, make a release to the App Center for testers, and upload your binary to iTunes Connect for an App Store submission.
The images below show the artifacts used during the release, environments in the pipeline, and the tasks in an environment.
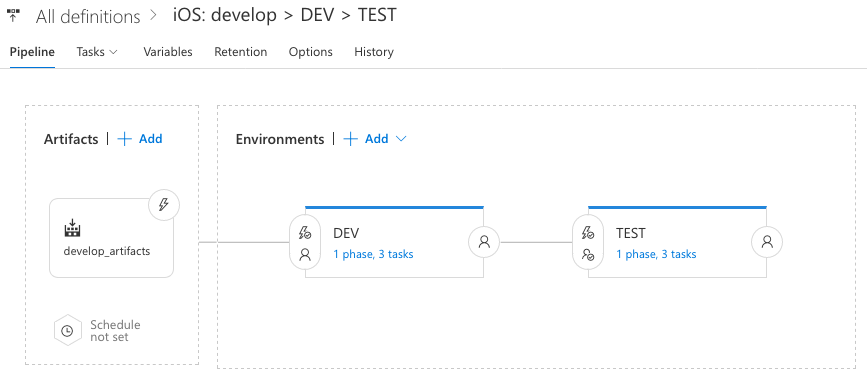

1. Specify artifact sources and environments in the pipeline
You can set pre-deployment approvers - who must manually approve a deployment to the specified environment.
2. Updating your app’s version number on release
A new release calls for a new version number, but your app is already built and packaged, how do you edit Info.plist now? Fastlane comes back into play with the resign action.
With the resign action, you can unpack .ipa files to update Info.plist properties and re-sign with any signing identity and provisioning profile you want.
VersionNumber is an empty VSTS process variable. The argument validation in the script file ensures that this value is set on release, otherwise it will exit with an error.
This example uses match to get the latest profile and passes the file path to the resign action.
3. Handy task for setting current UTC as an environment variable
5. Publishing to the Apple App Store
You’ll need to install the Apple App Store VSTS extension by Microsoft for this release task.
Sample continuous integration and continuous delivery for Web API projects
The initial build steps (1-6 below) are the same as with the Xamarin definition, outlined above.
Build definition
1. Set up build agent
2. Connect to your repository
3. Restore NuGet packages
For custom package sources, you can point to a NuGet configuration file in your source.
4. Build your solution
Setting PackageLocation in the MSBuild arguments is a handy shortcut to using the Copy Files task.
5. Run unit tests
6. Publish artifacts
Entity framework migrations
With the Entity Framework Migration VSTS extension, you can generate a migration script by providing a connection string and path to your migrations folder.
Alternatively, you can set the database initializer of your API to migrate to latest version on start up. See here for more information.
Release definition
1. Azure Resource Manager (ARM) templates
The infrastructure for your application is typically made up of multiple components – your API might need a web app, database, and database server.
Azure Resource Manager allows you to work with the resources in your solution as a group. You can deploy, update, or delete the resources for your solution in a single operation.
ARM templates are JSON files that are used to define and deploy these resources.
2. Deploy your app service
3. Database migrations
The Azure SQL Database Deployment task is what you would use to execute the migration script generated during the build process.
A DevOps approach to building and releasing a mobile app
With this collection of services supporting continuous integration and continuous delivery we were able to automate the processes needed to release mobile updates to different test groups and make updates to our API - all from one place and with just a click of a button.
The process is working well and has made us more productive by freeing us up from the repetitive, manual, and error-prone tasks of preparing a release for different environments. We can easily release to test environments to get feedback and make improvements.
This DevOps setup can be used for our other projects to make them efficient too. And using App Center provides the added benefit of useful information including crash reports and analytics like number of active users and daily sessions per user.


.jpg)

%20(1).png)
.png)
.png)

