


.jpg)

.png)
%20(1).png)
%20(700%20%C3%97%20500%20px)%20(2).png)


July 1, 2019
Exploring digital twins part 1: Azure DevKit and IoT Hub
This is the first in a series of tech blog posts about some recent Innovation Lab work on Internet of Things (IoT), digital twinning, and the 3D visualisation of IoT device sensor data in Mixiply, Theta’s augmented reality (AR) platform.
In Part 1 and 2 of this series, Rose McColl and Lillian Ho talk about their experience setting up a SignalR web app to receive and display data from an IoT device (in this case, the Azure IoT DevKit MXCHIP). They also cover Azure IoT Hub, using its in-built EventHub and message routing tools, and using Azure Functions to get device data to a web app.
Terminology
First of all, some explanations of the terminology we just used…
IoT
IoT stands for “Internet of Things”. Simply put, it refers to devices that are connected to the internet and have the ability to sense and transmit data about their physical surroundings. They may also have the ability to respond to environmental conditions or to messages received from the network. Wired magazine has a good overview of IoT. IoT is enabling the ‘Industry 4.0’ revolution, where the physical world is increasingly connected to the digital world, allowing businesses to gain huge improvements in efficiency and waste reduction.
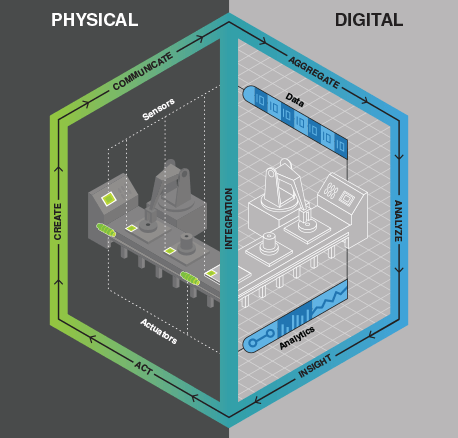
Digital twinning and digital twins
Digital twinning is the mapping of a physical asset to a digital platform – a virtual duplicate of a physical object or system. Data is collected by sensors attached to the physical object, and the digital twin incorporates that data to build a virtual representation of the object and its environment. Many industries are beginning to adopt the digital twin approach for product design, construction, and asset management of buildings and infrastructure, because it can increase efficiency and reduce waste, for example by predicting breakages before they happen. An Orbis Research report predicts that 85 per cent of IoT platforms will contain some form of digital twinning by 2020.
.png)
SignalR
A Microsoft ASP.NET library for making real time web apps. It allows you to push content on the server side to connected clients instantly as it becomes available, rather than having the server wait for a client to request new data. Example use cases are dashboards and monitoring applications, collaborative applications (such as simultaneous editing of documents), and real time gaming apps.
Azure IoT Hub
As IoT solutions scale up to tens, thousands or even millions of connected devices, management of devices becomes a difficult problem not just because of volume, but also because of security concerns. Cloud providers have come up with ways to easily register and verify devices, and Azure IoT Hub is Microsoft’s version of this. It's a fully managed cloud service that enables reliable and secure bi-directional communications between potentially millions of IoT devices and a solution back end. You can connect virtually any device to IoT Hub. It also enables things like fine-grained control over message routing, and automating device firmware update processes.
Azure Functions
Azure Functions is a serverless compute service that enables you to run small pieces of code on-demand without having to explicitly provision or manage infrastructure. Function apps can be triggered to run by particular events, such as a message being added to a queue, or an item being added to Blob storage. It’s perfect for IoT applications because you can scale up the number of devices, and your Functions will scale up accordingly.
AR/VR/MR
Virtual reality, augmented reality and mixed reality each refer to varying levels of merging - of the real and digital worlds - into what a user sees on a device or through a headset.
Virtual reality is a fully artificial environment, in augmented reality virtual objects are overlaid on real-world environments, and in mixed reality the virtual environment is combined with the real world.
Extended Reality (XR) is a newish term you might start to hear more often, that brings together AR/VR/MR under one umbrella.
Mixiply
A platform for creating and sharing augmented reality worlds, experiences and games. Mixiply allows you to create augmented reality apps (a “mix”) using Javascript, directly in your browser. Currently in beta, it’s free to check out here.
Why prototype an IoT setup for digital twinning in AR/VR?
We wanted to set up an end to end solution with telemetry streaming (device readings recorded and transmitted) from an IoT device through to a SignalR endpoint that will then be visualised in an AR/VR application. We see a lot of potential for 3D visualisation of data from the real world. It is likely to be a growth area so we wanted to investigate and get familiar with the technology and its potential and/or limitations.
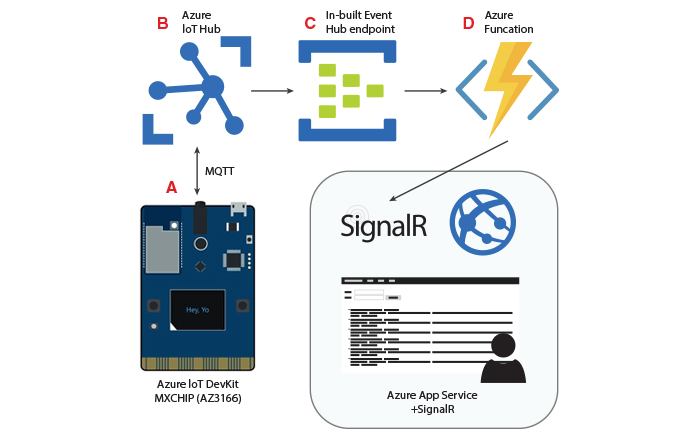
The initial prototype we implemented is shown in the diagram above. This setup is a useful proof of concept as it can be easily scaled up to many devices, multiple messaging routes, and various application endpoints just by making some slight modifications.
In this first post we’ll just talk about getting our development environment set up and getting the IoT DevKit to talk to IoT Hub.
*MQTT is one of the most commonly used protocols in IoT projects. It stands for Message Queuing Telemetry Transport. It is designed as a lightweight messaging protocol that uses publish/subscribe operations to exchange data between clients and the server.
Development Environment
We mainly use Visual Studio Code (VSCode) for our IoT development. We recommend it due to some of the very useful extensions that are available for working with Azure and the IoT DevKit, as well as its flexibility for developing in multiple languages and its customisability. We are writing our device code in the Arduino language, which is popular for IoT applications as it provides a simplified way to program the type of microcontroller boards used in IoT devices. So, we’ll also need some Arduino tools in our setup.
To get set up, there are instructions here from the Azure IoT Hub documentation. A quick summary:
1. Install the Arduino IDE (we’re on Windows, so we used the Windows Installer). This is required in order to compile Arduino code and upload it to devices:
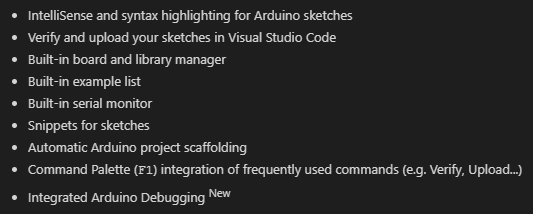
2. Install the Arduino VSCode extension. You also have to do a couple of configuration steps, which are detailed in the IoT Hub docs mentioned above. Along with the Arduino IDE, the Arduino extension pretty much allows you to do all the things listed here:
You could bypass VSCode and just work in the Arduino IDE if you wanted, but the ease of interaction with Azure in VSCode saves a lot of time.
3. Install the Azure IoT Tools VSCode extension. It contains the Azure IoT Device Workbench which is used to develop and debug on various IoT devkit devices, the Azure IoT Hub Toolkit to manage and interact with Azure IoT Hubs, and also the Azure loT Edge extension which is for developing and deploying artificial intelligence and custom logic to Azure loT Edge (it wasn’t required for this project). You can install these extensions individually too, but it’s handy to have them all in one package.
4. Install ST-Link drivers. This is required for your IoT DevKit to be able to talk to your development machine as it provides a USB interface. On Windows, you need to download and install the USB driver from the STMicroelectronics website. This is a bit of a hassle because you have to register before you can download the drivers. Once you have the download, unzip the folder and run the exe file. ST-Link should now be visible in Device Manager whenever the IoT DevKit device is plugged into the USB:

IoT Hub Setup
Before we set up our DevKit, we get IoT Hub up and running, because we are going to need to register our device and get a connection string for it in order to get it to talk to IoT Hub.
Once again, we refer to the Azure IoT Hub documentation on provisioning and configuring an IoT Hub resource. For prototyping, you can use the free tier, which gives you 8000 messages per day, and up to 500 devices. There are some other limitations too, such as only one custom message routing endpoint. Also bear in mind that messages are billed in blocks. On paid tiers the block size is 4kb, but the Free tier block is 0.5kb, therefore a 16kb message would be billed as 32 messages. You could chew through your 8000 messages quite easily if you accidentally left a device running!
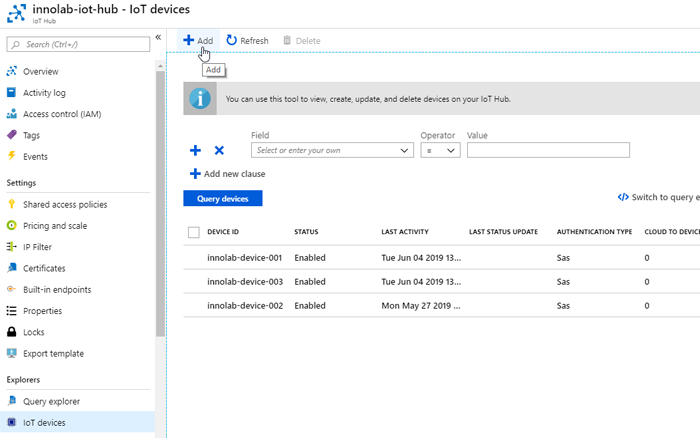
Once you have created an IoT Hub, you can register a device. You have to do this before you can send data to the hub. Devices have a unique name (Device ID). When a device is registered, it’s assigned primary and secondary keys and connection strings. You can register a device in IoT Hub within the Azure Portal, by going to the IoT devices tab, and clicking Add:
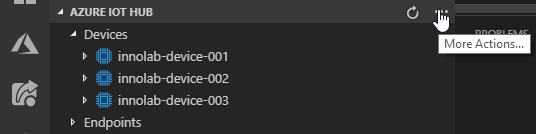
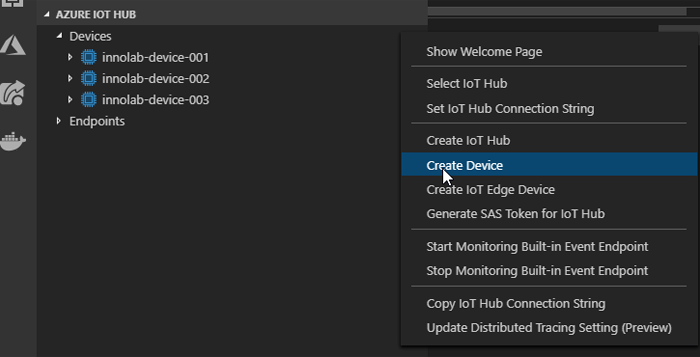
You can also register devices from within VSCode using the IoT Hub toolkit:
Hover on the Azure IoT Hub blade and click the ‘…’ for more actions. Choose ‘Create Device’.
Give the device a name, then press enter. If successfully created, there should be some console output which shows the device name, status, keys, connection strings and so on. This information is actually called the device twin. Device twins are JSON documents that store device state information including metadata, configurations, and conditions. Azure IoT Hub maintains a device twin for each device that you connect to IoT Hub.
Now we can set up our DevKit device!
Azure IoT DevKit Setup
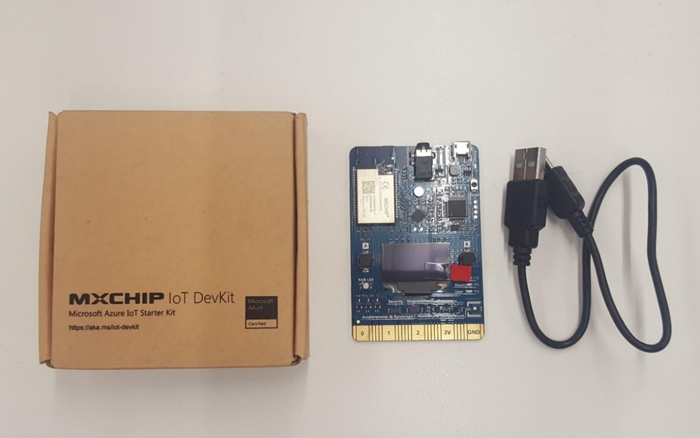
For our IoT device, we used an Azure MXCHIP IoT DevKit AZ3166. This device has sensors for pressure, temperature, humidity, as well as a motion sensor (gyroscope & accelerometer), and magnetometer all built-in. There are a range of SDKs for development, making it a pretty easy device to get started with.
This is what you get in the box:
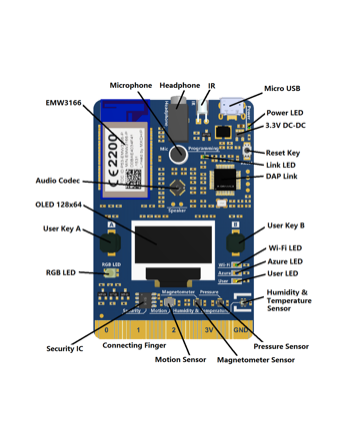
The device board setup is shown below:
Getting the DevKit set up took a few steps, but it wasn’t too long before we were up and running. The main things to do are a firmware update and get the Wi-Fi going. You can follow these instructions from the Azure IoT Hub documentation. Just be aware that you need your IoT Hub device connection string in order to do the configuration, because the device is set up to start sending telemetry to IoT Hub as soon as it connects to Wi-Fi. We used a mobile hotspot, but in a production environment you will likely be installing certificates and so on for proper network authentication – see this blog for advice on best practice around IoT device security and certificates. Also note that the DevKit only supports a 2.4GHz network.
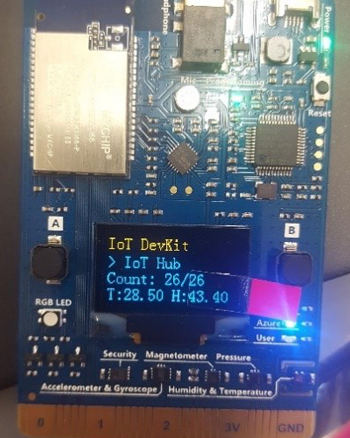
The device is now running the out-of-the-box demo code, which sends messages to IoT hub every few seconds. The next step is to write our own code and get that running on the device…
Arduino Coding!
Arduino is an open-source electronics platform that has been designed to simplify the process of working with microcontrollers. It is used for things like IoT applications, wearables, 3D printing, and even in complex scientific instruments. The Arduino programming language is based on Wiring, which is a simplified version of C/C++ languages.
When you write an Arduino script (known as a ‘sketch’), you need to include two functions; Setup() and Loop().
Setup() defines the initial state of the device upon boot and runs only once to do things that need to be performed before running the main program, e.g. check Wi-Fi connection, sensor calibration, initialise classes and variables.
Loop() is the main function and as its name suggests, it runs in a continuous loop. It contains the main logic of your program. We want to send data from each of the DevKit sensors to IoT Hub on a regular basis, so that is what will go in our loop.
There are examples available for sending basic temperature and humidity telemetry to IoT Hub, but we found very few examples of how to obtain and send the gyroscope, accelerometer and magnetometer data. It is straightforward to get the readings, but what we wanted to do was not that straightforward. The readings from the gyroscope are raw readings of angular velocity (a measure of how fast the sensor is turning around each axis). However, for this project, we wanted to obtain the orientation of the device using pitch, roll and yaw measurements. To get pitch, roll and yaw we have to calculate it by combining gyroscope, accelerometer and magnetometer data. So, writing code to get the device orientation is a little more time consuming and requires some calculations to get the data into a more usable format. Maybe we’ll write another blog post about that later!

Getting temperature, humidity and pressure readings from the sensors is a lot more straightforward. You can take the code from the DevKit ‘Get Started’ example project to begin with. In VSCode, press F1 for the command palette, then search for Azure IoT Device Workbench: Open Examples… Click this, then choose the IoT DevKit MXCHIP device. This window pops open, where you can see the Get Started project.
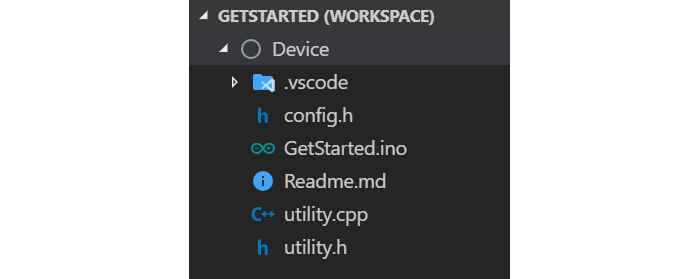
When you open the project, you see the following files:
This project sends temperature and humidity data to IoT Hub every second. Since we wanted these readings, as well as the pressure, we just added in some extra code to initialise the pressure sensor and get the readout.
Note: If you want to start your own project from scratch instead; just go to the command palette, and search for Azure Iot Device Workbench: Create Project…
The main Arduino code is in the GetStarted.ino file and contains the setup() and loop() functions as well as some utility functions for checking Wi-Fi and getting message confirmations from IoT Hub. The other main file is utility.cpp. This contains functions for initialising and reading the sensors and constructing our message payload.
To add pressure sensor data to our outgoing messages, we need to first add the library for the pressure sensor. In the utility.cpp file, add the include statement for the LPS22HBSensor:
Note: there is actually a handy shortcut if you want to include ALL the sensor libraries:
Next we add a function to initialise the pressure sensor:
And a function to read the pressure:
Then we just need to adjust the message payload to include the pressure readout, by modifying the readMessage() function to accept another parameter (float *pressureValue), adding a line to call the readPressure() function:
Then add the pressure reading to the message body (the root_object mentioned below):
Now we need to make some small changes to the GetStarted.ino file:
We declare a pressure variable:
In the setup() function we add a call to PSensorInit():
And in the loop() we add the pressure variable to the call to readMessage():
Finally, we need to modify utility.h file. This is where some functions are declared, so we need to add a declaration for the new PSensorInit() function we created:
And we’re done!
Uploading code to the device
Once your program is written, you need to upload it to the DevKit, which can be done using the Arduino extension in VSCode. If your device is plugged into your development machine, VSCode should pick it up automatically. You may just need to change the serial port to be able to communicate with the device. To do this, in the bottom right menu bar in VSCode, click <Select Serial Port> and choose whichever port is associated with STMicroelectronics (on my machine it was COM6):
Now you can go to the VSCode command palette (press F1) and choose Arduino: Upload. It will compile the code and upload it to the device if it passes verification.
The console output will look like this:

Wait...
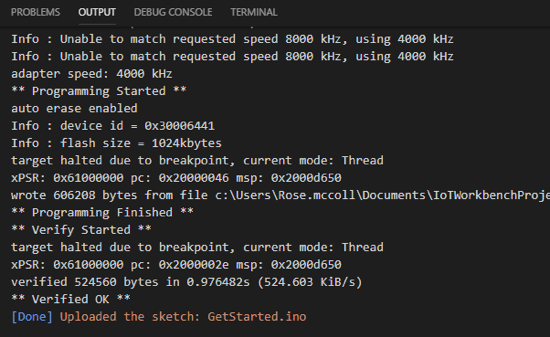
Once your upload is complete, the program will start running automatically!
So that’s it for this post. We found working with the DevKit to be generally straightforward, and VSCode was great for easily interacting with Azure IoT Hub without leaving the development environment.
The example projects for the DevKit are good but lacking in detail around using the motion and magnetometer sensors. You can go to the DevKit documentation to get some code samples and the sensor manufacturer’s website has information too, but that is also a bit unclear on what the methods do and the data format of the sensor readings.
Related Posts
%20(1).png)
July 8, 2019
Exploring digital twins part 2: IoT Hub, Azure Functions and SignalR
This is the second in a series of tech blog posts by Rose McColl and Lillian Ho, about some recent Innovation Lab work on Internet of Things (IoT), digital twinning, and the 3D visualisation of IoT device sensor data in Mixiply, Theta’s augmented reality (AR) platform.
%20(1).png)
July 15, 2019
Exploring digital twins Part 3: Raspberry Pi and Azure IoT Hub connection using Python
This is part three in a series of blog posts about some recent Innovation Lab work on Internet of Things (IoT), digital twinning, and the 3D visualisation of IoT device sensor data in Mixiply, Theta’s augmented reality (AR) platform. Extending from part one, this post will demonstrate sending telemetry from a Raspberry Pi IoT device to Azure’s IoT Hub, using Python.
%20(1).png)
July 30, 2019
Exploring digital twins part 4: AR/VR Digital Twinning with SignalR and Mixiply
This is the final post in a series of by Rose McColl and Lillian Ho, about some recent Innovation Lab work on Internet of Things (IoT), digital twinning, and the 3D visualisation of IoT device sensor data in Mixiply, Theta’s augmented reality (AR) platform.